First Line Belt Setup Review: Real-World Performance at Gunsite
First-Line Belt Review: Real-World Performance at Gunsite
After attending a .223 Defensive Carbine class at Gunsite, one thing became clear very quickly: ultimately, in a high-tempo training environment, a first-line belt setup either works flawlessly or detracts from the goal of learning.
Courses like this expose weak points fast. For example, loose retention, shifting belts, and poorly placed pouches pull attention away from learning and performance. A solid first-line belt setup should stay consistent, remain comfortable, and disappear once the work starts.
Specifically, this review covers the belt setup I ran throughout the class and how it performed under sustained use.
Why a First-Line Belts Matter
In fact, a first-line belt is the foundation of any effective shooter’s setup, both literally and figuratively. This belt carries your holster, magazines, medical gear, and essential tools. If it flexes, shifts, or sags, every draw, reload, and movement suffers.
Moreover, a properly built first-line belt provides rigidity without sacrificing comfort, keeping gear exactly where it belongs under stress and during prolonged wear. More than just a place to hang equipment, it establishes consistency, efficiency, and confidence, allowing the shooter to focus on performance rather than fighting their gear.
Therefore, in training, competition, or duty use, a dependable first-line belt is not an accessory. It is the foundation.
TL;DR
The gear did its job.
-
No hot spots
-
No retention failures
-
No distractions
Two minor issues did surface:
-
The medical pouch came off the belt due to operator error, not a gear failure
-
The flashlight holster screws loosened over time and required tightening
Neither issue stopped training or required more than minor adjustment.
Who This Setup Is For
Ideal Users
This setup works well for:
-
Shooters seeking a clean, proven first-line belt
-
Anyone prioritizing low profile and mobility
-
Anyone who values reliable retention without excess bulk
-
Shooters building a belt for duty use, competition, or high-volume training
Who It May Not Suit
This setup may not be ideal for:
-
Shooters who prefer rigid, non-elastic magazine pouches
-
Users running extremely heavy or oversized belt loads
Gear Breakdown
Belt
Holster
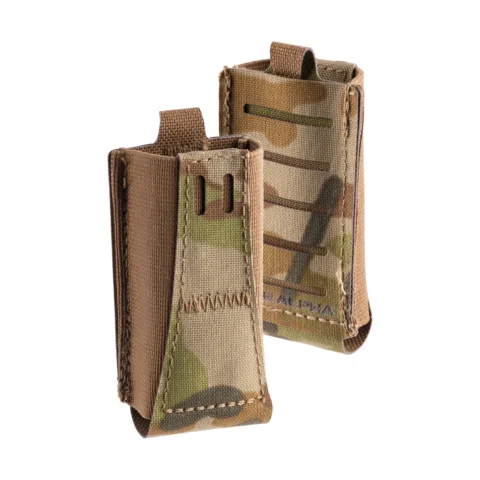
Magazine Pouches
Dump Pouch
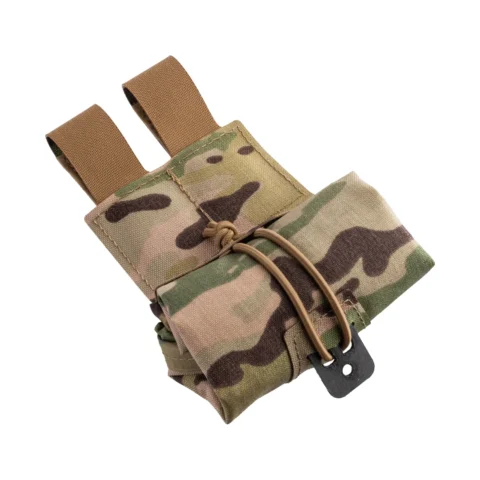
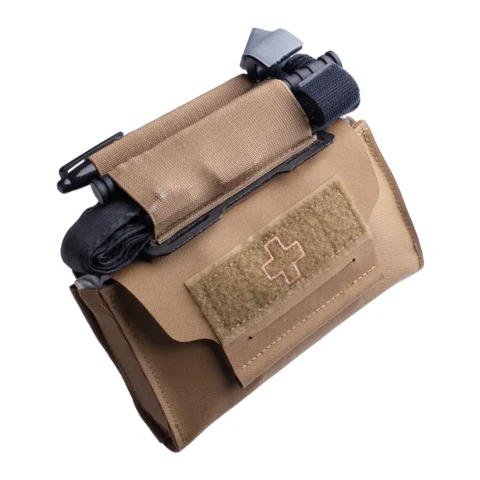
Medical
- Blue Alpha Tourniquet Holder
- Blue Alpha Med Pouch
- Loaded with Refuge Medical components
Lighting
First-Line Belt Performance and Use
First-Line Belt Stability
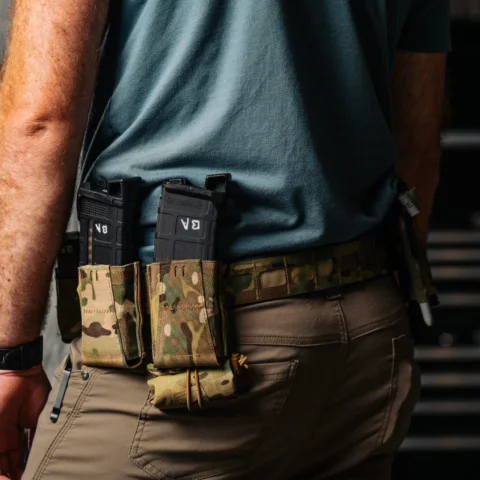
The Blue Alpha Battle Belt stayed locked in place for the entire course. The inner belt performed exactly as intended, with no shifting during movement, transitions, or reloads.
A stable belt is critical in high-tempo training. As a result, when your belt stays where it belongs, you can focus entirely on performance.
Pistol Magazine Pouches
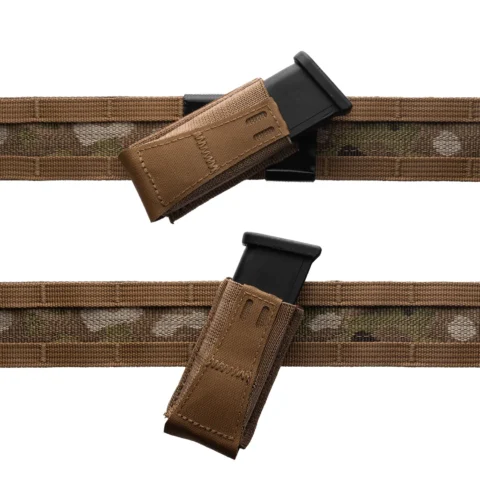
The 45-degree pistol magazine pouches were a standout feature. This was my first time running angled pouches, and they kept magazines tight to the body and out of the way. They remained comfortable and unobtrusive, even during prone work. additionally, angled pouches like these improve accessibility without interfering with movement.
Rifle Magazine Pouches
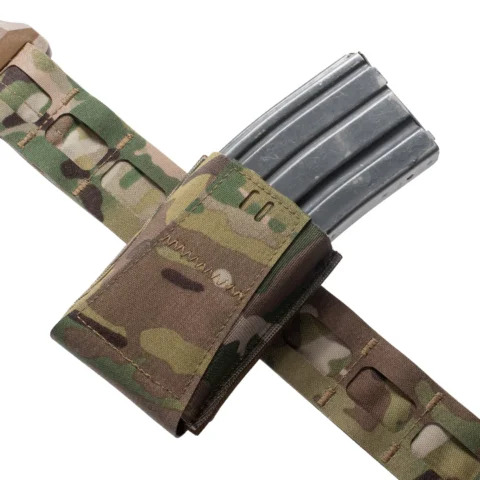
The rifle mag pouches saw heavy use over multiple days. Retention remained consistent from the first rep to the last (the elastic never “loosened” which I was quite surprised about). Magazines stayed secure during movement and removed smoothly during reloads.
I should mention that on my “normal” belt setup I typically only run 1 rifle pouch with my others on my plate carrier. For this class we needed the ability to carry a minimum of 2 rifle magazines on our belts, so I added the extra to meet the standard.
Dump Pouch: A Mandatory Piece of Kit
The dump pouch deployed easily and stayed out of the way when not in use. It never became a snag point or wasted space.
In fact, some will argue that aside from actual magazine pouches, a dump pouch may be the most versatile addition to a first-line belt, and I agree. Over my time in the military, I’ve used dump pouches for everything imaginable: snacks and water, extra ammo during range drills, evidence from onsite exploitation, or even a handy place for a drop charge. It is also a great and easy place to access when you need to execute a tactical reload and want or need to retain your magazine.
A dump pouch should be mandatory on your kit, not optional.
Furthermore, Blue Alpha’s adapter allows the pouch to mount under a mag pouch, saving valuable real estate. It’s a thoughtful solution designed by shooters to solve a real problem, not just another add-on.
Medical Gear and Why Quality Matters
Tourniquet Holder and Pouch Performance
A first-line medical pouch should stay secure and out of the way while allowing immediate access when seconds matter.
Throughout the course, the tourniquet holder remained secure and consistently accessible. The Blue Alpha medical pouch itself performed exactly as intended; the only failure point was my initial mounting method, not the pouch or the belt.
Consequently, that experience reinforces an important lesson: if you don’t run your kit, you’ll never truly know how it can fail. Weak points have a way of revealing themselves at the worst possible moment, which is why validating your setup in a controlled training environment is critical to building confidence.
Ambidextrous Access

One standout feature of the pouch is its ability to deploy from either side. For first-line medical gear, this is a must-have. Moreover, the ability to access lifesaving equipment from either the strong or support side adds a layer of redundancy that matters. You never know the position you’ll be in or whether you’ll have full use of both hands under stress.
Quality Medical Components
All medical components were sourced from Refuge Medical. Their kits are purpose-built, dependable, and easy to deploy under pressure. They are a solid choice for anyone serious about medical readiness.
Supplementary “Boo-Boo” Kit
In addition to a belt-mounted trauma kit, I strongly recommend carrying a small “boo-boo” kit in your range bag or kept close during training. Simple items like gauze, band-aids, Kerlix wrap for blisters or hot spots, and tape handle the minor issues that inevitably pop up. As a result, this prevents unnecessary digging into your primary trauma kit for problems that don’t warrant it.
Personal Recommendations
Refuge Medical has been my go-to for several years. I currently run two of their personal/first-line kits, keep one mounted to my truck’s headrest, and maintain a larger kit for classes and range use. Another brand I regularly use is mymedic. Their modular kits and medication packages are particularly useful, allowing you to access only what’s needed whether on the road, at the range, or on the ball field
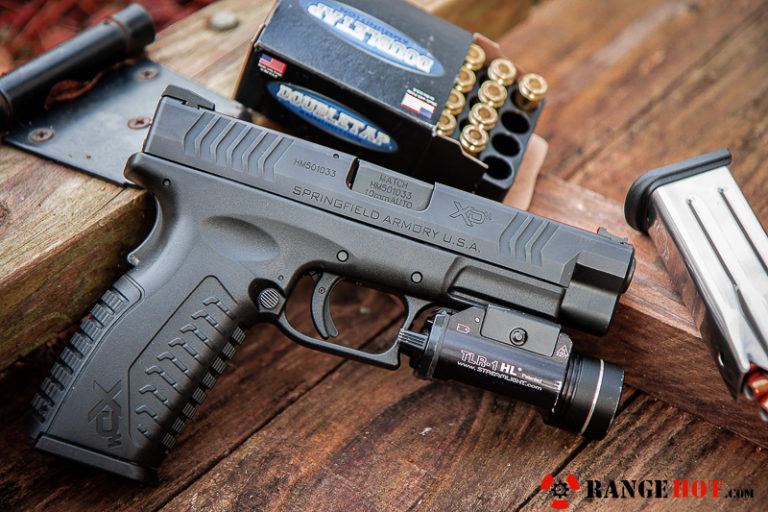
Holster Choice for Shooters Running Multiple Pistols
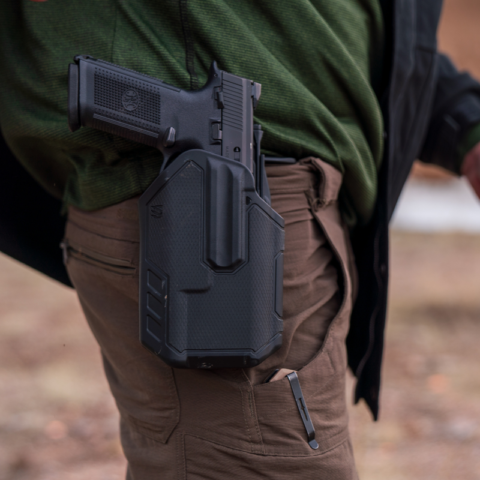
Why the Blackhawk Omnivore Works
The Blackhawk Omnivore holster is an ideal solution for shooters who routinely rotate between multiple pistols for training, evaluation, or duty use. Instead of locking onto a specific handgun model, the Omnivore secures the pistol by engaging the mounted weapon light, in my case the Streamlight TLR-1.
Consequently, this design allows multiple pistols to be run in the same holster without sacrificing retention. The biggest advantage is efficiency. There is no need to constantly swap holsters when changing platforms, which saves time and helps maintain a consistent draw stroke across different pistols.
Flexibility Through the Safariland QLS System
I run my Omnivore on a Safariland QLS fork system, which adds another layer of flexibility. In addition, due to my work, I am constantly changing pistols, some with weapon lights and some without.
When I am running full-size pistols equipped with TLR-1s, the Omnivore covers the majority of my needs without requiring multiple dedicated holsters. Anyone who has shown up to the range with the wrong holster knows how frustrating that can be.
Fast Transitions Between Platforms
When I switch to a pistol without a weapon light, or to a platform that does not interface with the Omnivore, the QLS system allows me to quickly swap to the appropriate holster and get back to work. Therefore, there is no reconfiguration and no wasted time.
For shooters who frequently change pistols, this modular approach keeps training efficient and consistent.
Practical Takeaway
For me, simple and adaptable gear is a must-have. The Blackhawk Omnivore, paired with the Safariland QLS system, delivers flexibility, consistency, and practicality for shooters who run more than one pistol.
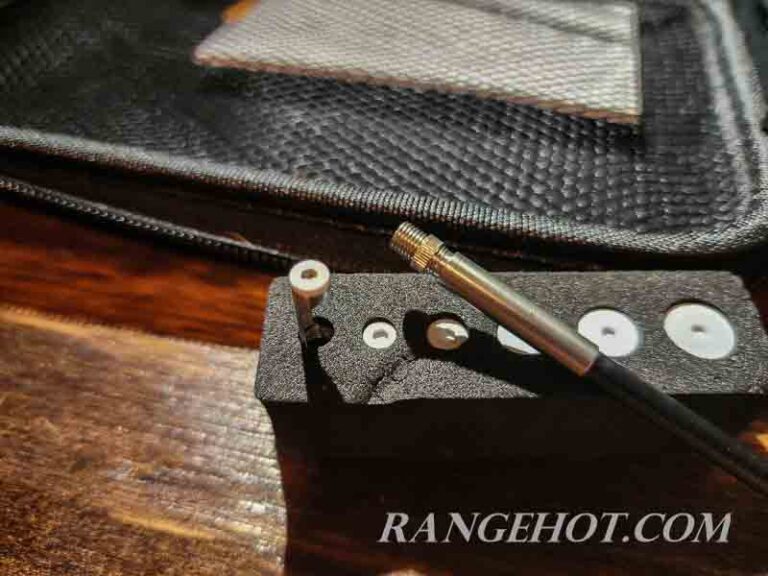
Lighting Performance and Maintenance
Streamlight remains my go-to brand for lighting. To me is features a great balance of performance vs. cost. I ran TLR-1 HL on my pistol and a ProTac 2.0 on my rifle (paired my rifle light with Unity Gas Cap and single button activator). For handheld use, I ran a second Streamlight ProTac 2.0 which delivered consistent output, as expected.
The only issue encountered was minor screw loosening on the kydex light pouch, not the light itself. This was easily corrected with thread locker during routine maintenance.
As a general rule, periodically checking screws and fasteners is smart practice. Movement, vibration, and recoil will always expose weak points. Similarly, routine inspections prevent small problems from becoming major failures. Murphy always gets a vote.
Miscellaneous Lessons Learned
One item I did not initially carry but quickly added was a small towel. After decades of training and deployments, this was the first time I questioned why I hadn’t always carried one.
I picked one up during the first break at the pro shop. It proved useful for wiping carbon, sweat, and dirt from my hands. It even helped control a minor cut. A small towel is now a permanent part of my first-line setup.
Final Thoughts
This first line belt setup allowed me to focus on training, not my gear. Everything stayed where it belonged. Retention remained consistent, and nothing interfered with movement or shooting positions which is the objective of a well-built first-line belt. If you’re assembling a belt for classes, EDC, or SHTF, this configuration proved where it matters most: under real use and over long training days.
The thoughts and equipment discussed here are based on my personal experience built over decades of training and use. However, your needs, preferences, and results may vary. The best approach is to start with a quality belt, add only what you need, and remove anything that doesn’t directly support you.
Mission drives equipment. It’s easy to wear a 10-15 pound first-line setup for 30 minutes on a flat range. In contrast, it’s a very different experience after eight hours in a class or in a real-world scenario where endurance and mobility matter. Those with thousands of hours wearing kit will echo the same lesson:
Ounces equal pounds. Pounds equal pain.
Build your belt accordingly.