Hornady LNL AP progressive press and updated EZ Ject change included
Hornady LNL AP progressive press and updated EZ Ject change included
It covers the original Hornady L-N-L AP press. Shorty after Hornady updated the ejection system to the EZ-Ject. The details of the EZ-Ject system are at the end of the review but if you have the initial ejection system the original article applies to your press.
Other than the ejection system the presses are near identical.
I was first exposed to reloading by my father when I was about 15. I was lucky enough to have the job of chamfering (beveling the inside of the neck). When I moved into my house my father gave me the Hornady Lock-N-Load single stage press and the necessary equipment to begin loading on my own. I had been in training (so to speak) a while by my father and a few of his friends who reload.
There is a gun shop that is a fixture in Raleigh, Hills and Bobby (who has been reloading longer than I have been on this earth) who I believe to be an expert on the subject. Friday afternoons are not that busy at Hills so I would stop by armed with a notebook and pen. I will say I learned as much from my father Ronnie and Bobby on reloading as I did reading books and manuals.
After a few years loading everything from .38 Smith and Wesson Special to .300 Weatherby Magnum on my trusty single stage, I had the opportunity to buy a Hornady Pro-7 progressive press at a great deal from another friend who has been into reloading many years now. I was pleased how much faster loading on a progressive press is than a single stage.
I got into some IDPA style shooting several years ago and I was really burning through the .45 Auto. The Pro-7 was hanging in there but it was October and my birthday was coming up so when I saw the L-N-L on sale at Midway it seemed like a sign. A quick call to the good folks at Midway (who by the way know me so well they have my height, weight, and blood type on file) and the L-N-L was on its way.
First Impressions
When I saw the UPS truck pull into my driveway a few days after my call to Midway I got all excited like it was Christmas. The man met me at the door with a large white box.

I unpacked the press and gave it a once over. It weighed in at 26 pounds and the first thing I noticed were three grease fittings placed in order to make lubrication much easier.

I started on the initial setup. Once I got the press mounted on my loading bench I began to assemble it.
The instruction manual helped but it was written for someone who has been reloading and is familiar with the process, like someone who is referencing a Chilton manual needs some mechanical experience.
Some initial steps
Before you set up your press here are a few good ideas to help smooth out the operation: Clean the primer tubes well. There is a thin film of oil that will interfere with primer feeding. I used isopropyl alcohol, a small cloth patch, and a cleaning rod.
It is also a good idea to lube the shell plate with a thin lubricant. I went ahead and cleaned the ram then greased the fittings with a few shots of marine grease. Be sure to mount the press securely as it has some weight and a good deal of force is required to load when all five stations are in play.
Another good idea is to cut a piece of wire about a foot long to place inside the primer tube on top of the primers (I used the bottom of a coat hanger). That adds a little weight to the primers to aid in primer feeding. It also gives you a reference as the primers are used. When the last primer is fed the wire will hold the primer slide back – another visual that you are out of primers.I have been told this is dangerous if the primers were to ignite so use this tip at your own risk.
Setup
Please bear in mind this is an abbreviated setup. The manual should be followed during initial setup. The L-N-L uses a separate shell plate to hold the case during loading. The shell plate is caliber specific and can be changed to accommodate different calibers (though some shell plates will hold different cases).

The shell plate is installed by a single 9/16″ bolt through to the sub plate. There is a case retainer spring that rides just under the shell plate that holds the case secure during indexing but will allow easy removal of the case during the loading process if necessary.

The primer slide is installed on a track in the sub plate. The wheel on the primer slide rides the cam feed primer as the ram is raised. At the top of the stroke the primer slide indexes the primer tube and picks up a primer. The primer arm is sprung to the sub plate so as the ram is lowered the primer slide is drawn back down the track and under the shell plate. The primer is seated at the bottom of the stroke by the primer seater punch. The primer seater punch is located under the sub plate.

Changing the primer slide (depending on what size primer you are loading) is a matter of unhooking the spring, sliding one out and sliding the other in. Then the primer slide spring is reattached. The primer seater is changed by raising the ram loosening one and changing it then retightening.


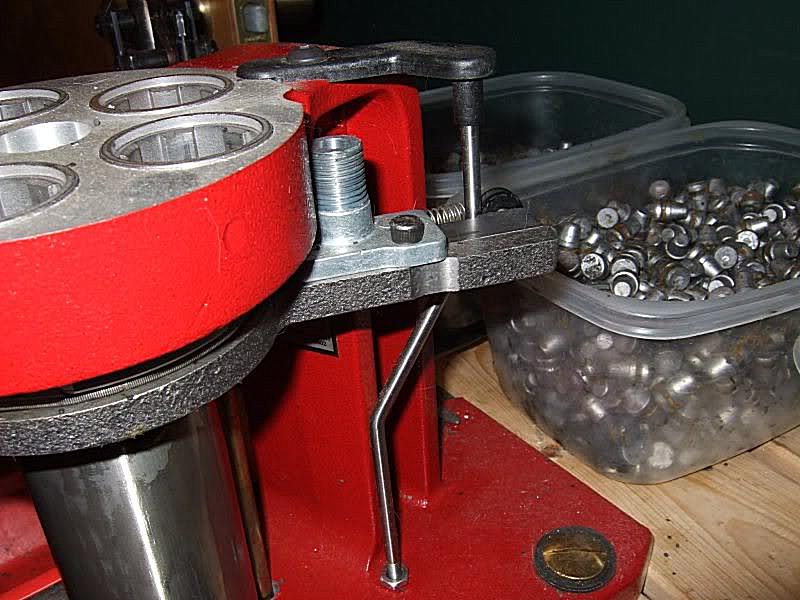
The primer tube rests in the primer tube housing body (which is fastened to the sub plate). A primer tube housing then threads onto the body. The housing keeps the primer tube centered in the body and also protects it, as the tube will be full of little explosives.
There is another primer tube known as the primer tube pickup. This tube is used to pick up primers off a turning plate (or whatever is used to prepare the primers). Once the pick up tube is full it is turned over, a cotter pin holds the primers from sliding out the open end. When primers are ready to load the pick up tube is held over the primer tube. The primer tube support holds the tubes in alignment.

Once you have the two tubes aligned, the cotter pin is pulled and – whamo – the primer tube is full. The primer tube holds approximately 100 primers.

Changing primer tubes is pretty simple: screw the primer tube housing off the primer tube housing body, then pull out the primer tube (making sure there are no primers left inside) replacing it and then the housing. (I know this is pretty dry reading but we are getting in the short rows so please be patient.)
The case activated powder measure is what delivers the powder to the case and does so only when a case is present.
The powder measure can be adjusted by threading the meter insert out to increase volume of powder dispensed. The metering insert is easily removed by depressing a retaining pin and removing the insert.
Some people decide to have different inserts set up for specific powder charges and so change out is easy if that route is taken. Another option is a micrometer measure when once a charge is reached the measurement can be recorded and that charge volume can be returned to by referencing the recorded numbers of the insert. . (Of course however you do it, it’s a good idea to double check the setting with your scale by actually weighing some charges thrown.)
Lock-N-Load feature
In my opinion here is where the Hornady press really shines. Initial setup is the same as a conventional press. The die (or any other L-N-L accessory) is threaded into a bushing that is locked into the top of the press (the lock is similar to the locking lugs on a bolt action rifle).
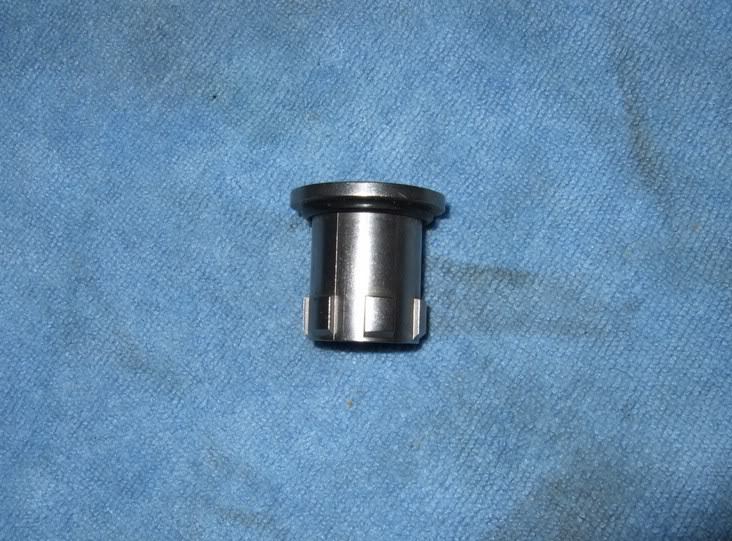
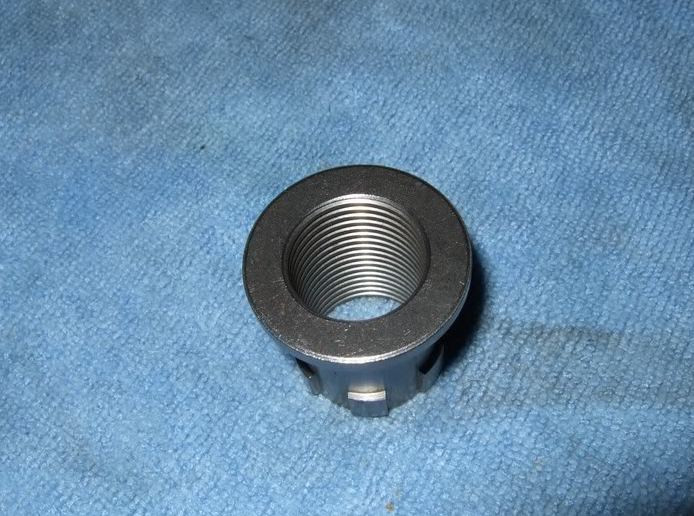
The Lock-N-Load bushing

Once the die is set up correctly, a lock nut is tightened to the bushing. Here is a picture of a die on the left with the bushing installed while the one on the right is without.


When that die needs to be removed, instead of threading it out and losing the adjustment, the bushing unlocks by a quarter turn and then is removed.
The die setup is still intact within the bushing. This is very handy when it comes to draining the powder measure, as the measure is unlocked from the press and can be emptied back into the powder container. When a die needs to be removed for cleaning, caliber change, or any other reason the whole process is simplified and sped up tremendously by the L-N-L system since dies may easily be removed without changing settings.
Operation
(note this is a abbreviated discussion of my procedure, follow your loading manual carefully)
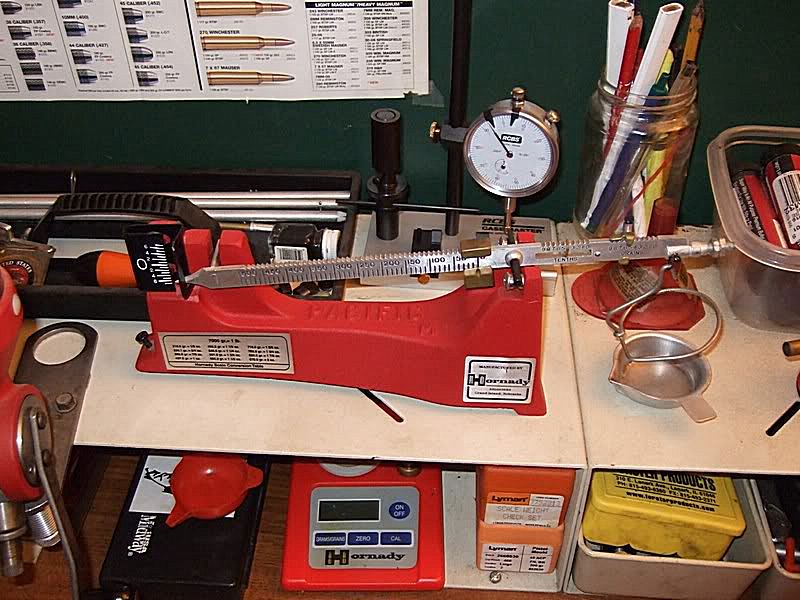
I start the reloading process by verifying my powder charge on a powder measure. Before loading commences I drop a charge directly into the pan and check it to be sure I am loading the correct powder to the correct weight.

Once the charge has been verified, I gather my clean cases and check them for damage and to be sure they are in spec. Next I will organize them in a case block, and spray them with case lube. I will load up the primers in the primer tube and start the case in stage one.

The first step will deprime and resize the case as the ram is raised. Here is a good place to point out that the spent primer is carried from the press through a clear tube into a container. This is a nice feature as it keeps spent primers from crowding the bench or off the floor


On the down stroke the new primer that was picked up by the primer slide will be pressed into the primer pocket. As the ram is raised the case will activate the powder measure and the powder charge will be dispensed.

As the ram is lowered and then raised again the shell plate advances the case to the third stage where I have the Hornady Powder Cop Die. This die will verify the correct powder charge by the position of the white O ring above the die.

Keep in mind that you need to visually inspect the case throughout the loading process to double check the powder measure and to be sure everything is going as it should. Remember safety first.

The next stage is the belling die that puts a slight bell on the case mouth, which is especially useful when loading lead to keep the case mouth from shaving lead off the bullet. The last stage is where the bullet is seated. Place a bullet on the belled case mouth (another good opportunity to check to be sure everything is in order such as powder charge).

Then the last step seats the bullet and, as the ram is lowered, the ejector wire kicks the finished round into the catcher.
It is a good idea to verify the powder charge from time to time during the loading process. I will usually scale a charge every 50 rounds give or take to be on the safe side.
Some people get caught up in loading speed. Though a progressive press is much faster than a single stage, there is no excuse to jeopardize safety for bragging rights on rounds loaded per hour. Imagine what those bragging rights would be worth if a failure occurred at the range. I would rather take my time and go a little slower. I may not be as fast as everybody but I do have confidence in my reloads. I would hate to explode a firearm and risk injury due to a reloading mistake.
Hornady EZ-Ject
updated ejection system, though there was truthfully nothing really wrong with the ejection wire system though it took a bit of adjustment.

Ejection wire system.

EZ Ject system.
I have always lived by the wisdom, “If it ain’t broke, don’t fix it.” Well, some things are not that cut and dry; there is always room for improvement. When Steve at Hornady told me the Lock-N-Load AP progressive press had been improved for 2009 I thought to myself, “He must been kidding me”
Turns out he was serious. The one complaint that surfaced about the current L-N-L AP was the placement of the ejector wire interfering with a crimp die threaded into station five when the ram was at full throw (especially if the last die was not a Hornady die). When I first set up my Hornady seater die to seat and crimp, there was a little interference on the old style press. I adjusted the ejector wire closer to the center of the shell plate using the set screw and bent the loop closed just a shade to give me the clearance I needed to keep on keeping on and never gave it a second thought (somewhat pleased with my ingenuity). Unfortunately, it seems this remedy did not work for everyone. Hornady recognized this problem and set out to correct it.
The new set up-dubbed the E-Z-Ject system-is pretty slick. The ejector wire was done away with all together and a tab was machined into the sub plate to take its place. With the tab under the shell place there will be no interference with the dies.

I also see the new press uses a socket head cap screw to secure the shell plate to the sub plate instead of a hex head fastener.

The handle was also changed from a slick, shiny finish to a dull, tactile finish.

The new L-N-L AP also comes with the pistol rotor for the powder dispenser. This makes metering small powder charges more consistent.

The shell plates are also different. The new style shell plates will work with the old L-N-L AP press but the old style shell plates will not work with the new EZ-Ject system.
Most these changes are subtle. One by itself may not make a great deal of difference (with the exception of the E-Z-Ject system) but cumulatively they do make a difference.
I set up the new press exactly the same as the older L-N-L press. I snapped the .45 Automatic dies from my old press and locked them into place on the new press. I began reloading .45 auto straight away and all was as it should be. I did not need to adjust the dies when going from one press to the other. Next I transferred my Hornady case feeder to the new press and loaded up another box of rounds. As with the dies, I did not need to readjust the case feeder to get correct operation. I finished off most of the 200gr LSWCs for .45 Auto that I had sized and lubed using the case feeder and operation was flawless.
Rest assured there will always be a place on my loading bench for my old L-N-L AP but I have made new space to accommodate the updated L-N-L.
Some notes about reloading
Since this review is about a reloading press I thought I should add some of my opinions here. For someone who is looking to get started in reloading, the principles behind it and the choices in equipment can be intimidating. There are three basic styles of presses to be considered single stage, turret, and progressive. I started out with a single stage and that is what I would recommend to someone who is just starting out. The single stage press does one stage at the time be it resize, bell the case, or seat the round. After each operation the die must be changed for the next step. It is slower than the turret or progressive but simpler to operate.
The turret press operates much like the single stage but instead of having to change the die the top of the press has provisions for each die and as the steps are progressed through the turret can be shifted to index the next die over the case. Faster than a single stage but still a little simpler than a progressive.
Reloading is not difficult, though there is a certain amount of skill involved. Keep in mind there is big difference in loading up a bunch of .45 Auto to go and burn through in an IDPA match verses loading for a .308 benchrest rifle but the fundamentals are the same. Starting out by reading a few books on reloading is the way to go and if you know someone who can show you, that is even better.
I suggest the ABCs of Reloading and the NRA’s guide to reloading as well as a few good manuals. I am partial to the Hornady, Sierra, and Lyman manuals myself but I also have copies of Nosler and Speer loading manuals.
I also believe when it comes to tools that is not where you should be looking for the cheap way out. Quality reloading tools will last a lifetime. I also believe there are options when it comes to quality reloading equipment. When most folks begin to speak about getting a progressive press they are bombarded by opinions. I understand there are other fine presses on the market but part of my reason for this review is to show there are options. When making a purchase the well-informed consumer is the one who is ahead of the game so do not just jump on the bandwagon because everyone tells you to. Enough of that.
Reloading is, to a degree, dangerous. Using primers, powder, and handling lead require careful attention and preparation. All the normal guidelines should be followed outlined in the manual.
Another point I would like to cover is minimum and maximum listed powder charges in your loading manual. They are listed for a reason; can you go above and below and get away with it? Maybe. For how many times? Who knows? Are you anxious to try your luck? I’m not.
When a case is loaded with a light powder charge (below listed minimum charge) and that round is horizontal in the chamber the flame from the ignited primer can flashover the powder lying in the case. When that happens a few different things may occur. The most unlikely is nothing will happen. It is possible that the round will go off as intended and everything is good to go. The worst case scenario is the powder charge will begin to burn in the front of the powder charge and enough pressure builds to drive the bullet from the case mouth and into the bore. As the rest of the powder charge burns and pressure continues to build that gas is now trying to drive the bullet (that has already been seated into the rifling) and that is where a problem could occur. Now we have excessive pressure and that may or may not result in a catastrophic failure.
There is also another theory on minimum loads causing excessive pressure. I am not sure I agree with this but will include it for the sake of safety. It is called the logjam effect. If the minimum charge is concentrated at the case head when the primer ignites the powder at the rear of the charge the rest of the powder is slammed to the base of the bullet causing a solid plug. As the powder continues to deflagrate pressure builds but as the bullet has plugged the bore an explosion is very likely.
Exceeding maximum charge is not a good idea. I hear people tell me they load above published data all the time without a problem. Everything has a limit, and once that limit is reached problems arise. Generally your more accurate load will not be maximum charge so going past that is taking a chance, not to mention a waste of powder and putting your firearm under undue stress. The increase of velocity and pressure is not linear. All bullets of the same caliber and weight are not the same. There are different designs that require different load data because of bearing surface, jacket thickness, alloy hardness, and other variables.
Conclusion
I have always been satisfied with the Hornady line of reloading equipment. I have loaded a blue million rounds on the Hornady line and so far I have had very little trouble. The press needs some adjustment prior to beginning to get it running but once it is set up she is good to go. Hornady customer service is excellent. I am totally satisfied with the Hornady Lock-N-Load progressive press. With that said I would not recommend a progressive press for someone who is just beginning the reloading hobby without thinking it through. There is a lot going on at once with a progressive press and a clear understanding of the reloading process is important for getting the most from your press.
Final Note
Follow the manual, when in doubt always ask. Safety first.
Specifications
O frame design press made from die cast heat treated aluminum alloy.
Die threads 7/8″ X 14
Ram stroke 4 ¾”
Ram circumference 2 inches
Finish Powder coat.
Weight 26 pounds
Height 35 inches
Width 10 inches
Depth 10 inches
Opening to the shell plate 5 inches
Note dimensions are approximate of assembled press but much more room will be needed to operate.
Primer tube capacity 100 primers
Supplied box catcher approximately 80 pistol rounds.
Acknowledgments
Bobby at Hills Inc.
Ronnie my father
Hornady.
Sources
Reloading Press
Hornady
![]()
Hornady Mfg. Co
P.O. Box 1848,
Grand Island, NE 68802-1848
USA
Phone: 1-800-338-3220
Fax: (1) 308-382-5761
Email: webmaster@hornady.com
Web site: http://www.hornady.com